 Save to Pinterest
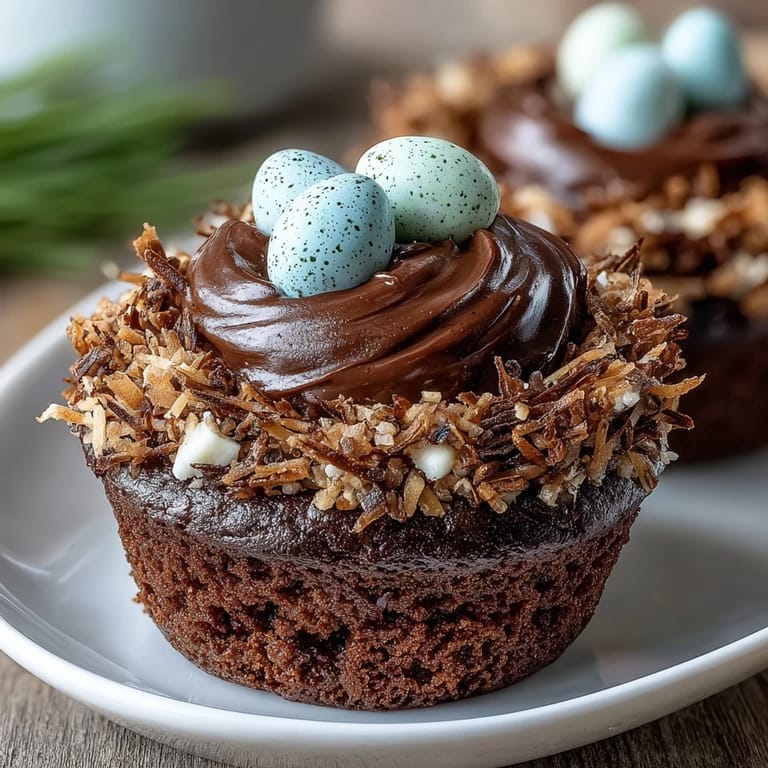
 Chocolate always seems to bring out the playful side in the kitchen, especially when a hint of holiday fun is involved. The first time I made Easter Nest Cupcakes, I remember accidentally dropping a handful of pastel candy eggs across the counter, and laughing as they rolled everywhere like tiny edible marbles. The kitchen filled with the cozy aroma of cocoa, and I could almost sense the anticipation for spring gathering around each cupcake liner. Decorating these nests is as much about improvising as it is about precision, and the results are always as charming as a sunlit morning after a long winter. Sometimes, all you need is a bit of whimsy to brighten the day—and a chocolate cupcake (or twelve) never hurts either.
One memorable Easter, I let my niece and nephew help with the decorating, and it somehow turned into a friendly contest over whose cupcake held the most ‘authentic’ nest design. We piled on the buttercream, let sprinkles fly, and turned the table into a happy mess. There’s something reassuring about cracked candy eggshells and coconut scattered on the floor—it felt like the perfect way to welcome spring together. In that moment, it wasn’t about perfect piping or neatness, but about making memories with chocolatey fingers and bursts of laughter. That’s the real joy hidden inside each bite.
Ingredients
- All-purpose flour: This gives the cupcakes their delicate structure—sift it for extra fluffiness.
- Unsweetened cocoa powder: The rich base for both cake and frosting—choose a good-quality brand for dependable depth of flavor.
- Granulated sugar: Adds sweetness and moisture; I’ve tried less, but the cupcakes lost their magic.
- Baking powder and baking soda: Both are needed to make the cupcakes rise, so double-check their freshness.
- Salt: Just a pinch wakes up all the other flavors—don’t skip it.
- Eggs: They bind everything together and give a lovely richness—room temperature is best for even mixing.
- Whole milk: This keeps the cupcakes soft and moist—if you substitute with plant milk, the texture will vary slightly.
- Vegetable oil: Oil creates that melt-in-your-mouth crumb you want in a cupcake.
- Vanilla extract: A touch of vanilla softens and rounds out the cocoa’s earthy notes.
- Hot water: Don’t worry if your batter looks thin; the hot water blooms the cocoa, making the cakes extra chocolatey.
- Unsalted butter: For the buttercream—a squeeze test with your fingers should leave a light dent for perfect softness.
- Powdered sugar: Sifting makes the frosting smooth and lump-free—learned this the hard way after a clumpy first try.
- Shredded coconut or chocolate sprinkles: Optional, but they create a fun texture for the ‘nest’—toasting the coconut is a secret twist.
- Mini candy-coated chocolate eggs: These turn simple chocolate cupcakes into festive treats—don’t be shy, a few extra never hurts.
Tired of Takeout? 🥡
Get 10 meals you can make faster than delivery arrives. Seriously.
One email. No spam. Unsubscribe anytime.
Instructions
- Prep your pans:
- Line a muffin tin with cupcake liners and set your oven to preheat at 350°F (175°C), so it’s ready when you are.
- Mix dry ingredients:
- Whisk together the flour, cocoa powder, sugar, baking powder, baking soda, and salt in a big bowl—the kitchen will start to smell like chocolate already.
- Combine the wet crew:
- In a separate bowl, beat eggs, milk, oil, and vanilla until it’s blended and creamy.
- Bring it all together:
- Pour the wet mix into the dry, then add the hot water. Don’t fret about the thin batter; it just means moist cupcakes ahead.
- Fill and bake:
- Scoop the batter into your liners, filling each about two-thirds. Slide them into the oven and bake for 18–20 minutes, until a toothpick comes out clean.
- Cool it down:
- Let the cupcakes rest in the tin for a few minutes before moving them to a wire rack—cooling is crucial for perfect frosting later.
- Whip up the chocolate buttercream:
- Beat the softened butter, powdered sugar, cocoa, milk, vanilla, and salt until airy and glossy—it should hold soft peaks when the mixer stops.
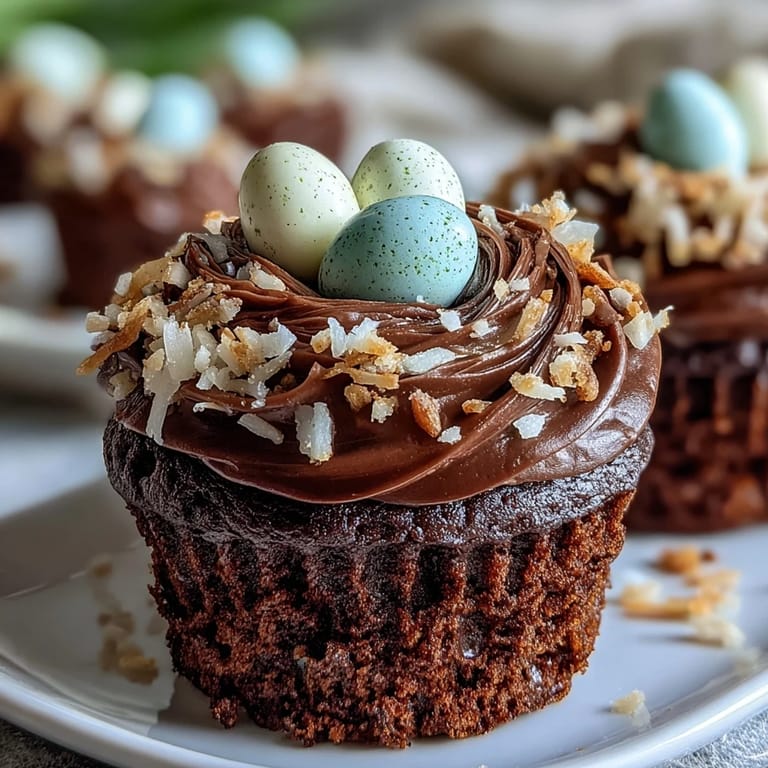
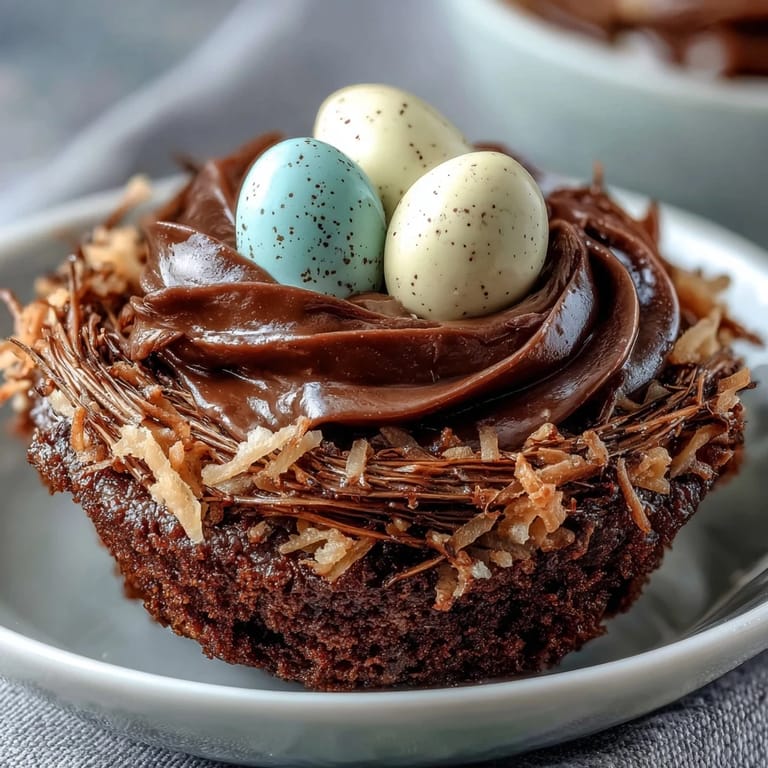
- Decorate your nests:
- Once cupcakes are cool, pipe or spread buttercream in circles to form nest-like swirls.
- Add texture (optional):
- Sprinkle on toasted coconut or chocolate sprinkles to amp up the nest effect, pressing gently so they stick.
- Nestle the eggs:
- Place 2–3 mini candy eggs in the center of each nest, and try not to sneak too many for yourself while decorating.
 Save to Pinterest
 The year I baked these for a neighbor’s spring brunch, an unexpected rainstorm sent everyone inside, raindrops drumming on the windows as kids clustered around the dessert tray. Those cupcakes disappeared in a flash, but it was the warm buzz of shared conversation and chocolate smiles that stayed with me. Sometimes the right dessert can turn a grey day bright, one bite at a time.
Making Them Your Own
I’ve swapped in almond extract for half the vanilla before and the subtle difference made people guess at my ‘secret ingredient.’ Don’t hesitate to play with sprinkle colors, or even use dark chocolate shavings if coconut isn’t your crowd’s favorite. If you’re baking with little helpers, let them choose their nest filling and cheer them on—it’s as much about the creative moment as the result. There’s no ‘right’ way to make a nest, and each cupcake becomes its own tiny piece of edible art.
Troubleshooting Sticky Situations
If your cupcakes sink in the middle, it’s often due to overmixing or opening the oven too soon—I learned to just peek through the oven window until at least 15 minutes passed. A gritty buttercream means the sugar wasn’t sifted or fully beaten, so don’t cut corners there. If you’re short on piping bags, a zip-top bag with the tip snipped off works in a pinch. Decorating a cracked cupcake is totally fair game—just crown it with extra frosting and no one will notice.
Extra Festive Touches for the Holiday Table
A small dash of coffee in the batter deepens the chocolate flavor and no one will taste the coffee itself. For a springtime table, tuck cupcakes into a basket lined with colorful tissue paper or artificial grass for instant wow. Don’t forget to snap a quick photo before everyone dives in—the nests disappear faster than you’d expect.
- Add food coloring to coconut for playful pink or green nests.
- Swap candy eggs for jelly beans or candied almonds if you’re feeling creative.
- Always double-check for stray eggshells in your batter—just in case!
 Save to Pinterest
 May your Easter be sweet, colorful, and filled with laughter—these nest cupcakes are guaranteed to bring smiles and chocolate-smudged fingertips to your celebration.
Recipe FAQs
- → How do I keep the cupcakes moist?
Use the hot water called for in the batter, avoid overmixing once wet and dry ingredients are combined, and bake until a toothpick comes out clean. The oil and eggs help retain moisture—watch the bake time closely to prevent dryness.
- → Can I substitute different cocoa types?
Yes. Natural or Dutch-processed cocoa will both work, though flavor and color vary. If using Dutch-processed, you may notice a smoother, darker chocolate note; adjust sweetness slightly if desired.
- → What tip and technique create the nest shape?
Use a round or open star tip to pipe a ring of buttercream, then pipe a shallower inner ring to form a well. Alternatively, spread frosting with a spoon in circular motions to carve a nest. Chilling the cupcakes briefly before piping helps the shape hold.
- → How do I toast shredded coconut safely?
Spread coconut in a thin layer on a baking sheet and toast at 325–350°F (160–175°C) for 4–7 minutes, stirring once, until golden. Watch closely—coconut browns quickly. Cool before sprinkling to retain crisp texture.
- → How should I store these cupcakes?
Keep at room temperature in an airtight container for up to 2 days. For longer storage, refrigerate up to 4 days. To freeze, separate frosting from the base: freeze cupcake bases wrapped tightly, and thaw before topping, or freeze assembled cupcakes up to 1 month.
- → Any tips for allergen or dietary swaps?
Use gluten-free all-purpose flour cup-for-cup to make the base gluten-free, and swap dairy butter for a plant-based alternative with similar fat content for a dairy-free buttercream. Check candy labels for soy or other allergens.