 Save to Pinterest
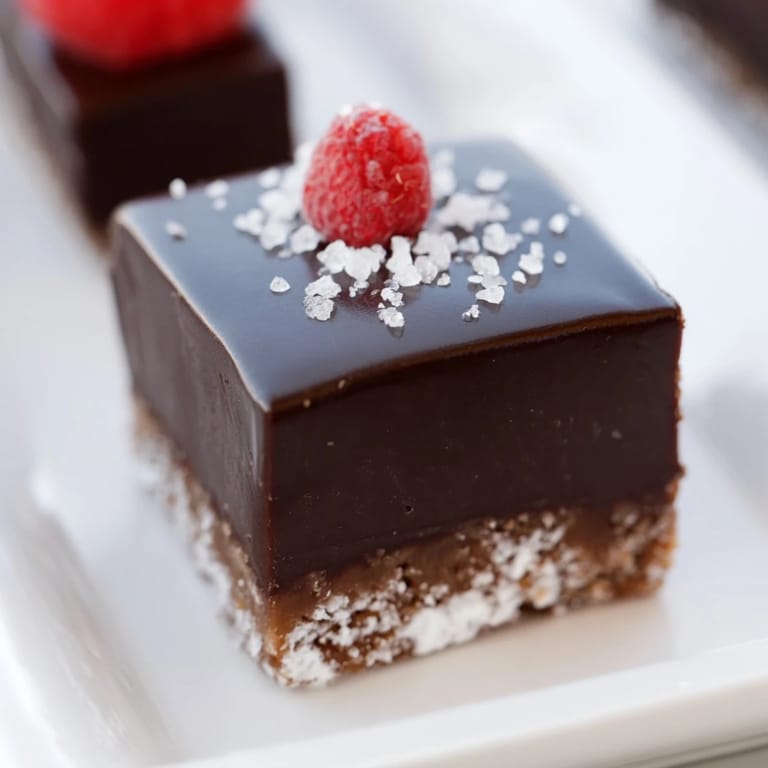
 I discovered this dessert at a dinner party where a friend served tiny squares arranged like a game board, and watching guests pause to figure out which texture they wanted next was pure joy. It wasn't complicated—just four different layers, each with its own personality, arranged so no two textures touched diagonally. Since that night, I've made it dozens of times, and it never fails to spark conversation. The beauty is in its simplicity and the element of playful choice it gives anyone eating it.
The first time I made this for my sister's book club, I remember the quiet chaos of the assembly line—four of us standing around the kitchen counter with tiny spoons, carefully filling each square while she narrated like a sports commentator. Someone knocked over the ganache, we laughed harder than we should have, and by the end we had created something that looked intentional and slightly fancy, even though it was held together by refrigeration and hope.
Ingredients
- Crisp shortbread cookies (80 g): These form the foundation and one quarter of your final squares; use something buttery and thin that shatters when you bite it, or swap in graham crackers if you want a slightly less sweet base.
- Unsalted butter, melted (30 g): This binds the crushed cookies into a cohesive layer that won't crumble when you fill the squares above it.
- Cream cheese, softened (80 g): This becomes the soft layer, tangy enough to balance the sweetness without overpowering the whole affair.
- Powdered sugar (30 g): Just enough to sweeten the cream cheese layer without making it gritty or dense.
- Vanilla extract (1 tsp): A small amount adds warmth and ties all the layers together flavor-wise.
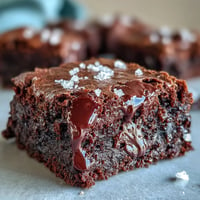
- Dark chocolate, chopped (100 g): Quality matters here since there's nowhere for mediocre chocolate to hide; aim for something between 65–72% cacao.
- Heavy cream (60 ml): Hot cream blooms the chocolate into a silky ganache that sets just firm enough to scoop into squares.
- Salted caramel sauce (80 g): Store-bought saves time and stress; if you're making your own, do it the day before so it's completely cooled.
- Flaky sea salt: A pinch scattered over the caramel catches the light and reminds everyone that salt and sweet are best friends.
- Small raspberries (16 optional): These crown the crunchy squares with a pop of color and slight tartness that cuts through the richness.
Tired of Takeout? 🥡
Get 10 meals you can make faster than delivery arrives. Seriously.
One email. No spam. Unsubscribe anytime.
Instructions
- Build your base:
- Crush the cookies into uneven crumbs—some should be powder, some should be pea-sized pieces—then toss with melted butter until it looks like damp sand. Press this into a parchment-lined 20×20 cm baking dish, using the bottom of a measuring cup to pack it down evenly, then slide the whole thing into the fridge for 15 minutes so it firms up and becomes something you can build on top of.
- Whip the soft layer:
- Beat softened cream cheese with powdered sugar and vanilla until there's not a single lump and the whole thing is light and fluffy, which takes about 2 minutes with an electric mixer. This airy texture is what makes the layer feel delicate rather than dense.
- Create silky chocolate:
- Heat cream until tiny bubbles form around the edges, then pour it over chopped chocolate and let them sit together for 2 minutes so the heat can work its magic. Stir gently until the ganache turns smooth and glossy, then set it aside to cool just enough that it won't melt into the other layers.
- Mark your grid:
- Once the crunchy base is chilled, use a ruler and a sharp knife to lightly score the surface into 16 equal squares (four rows, four columns), pressing just enough to create guides without cutting all the way through. This takes more patience than you'd think but saves chaos during assembly.
- Fill each square with intention:
- Working in quadrants, fill four opposite-corner squares with cream cheese, four with ganache, four with caramel (then sprinkle with flaky salt), and leave four as plain crunchy base (topped with raspberries if you like). Arrange them so that no two identical textures sit next to each other—a real checkerboard pattern—which looks intentional and tastes like you planned every moment.
- Chill and set:
- Return the assembled dessert to the fridge for 30 minutes, which gives the ganache time to firm up and all the flavors a chance to meld slightly. This step feels like the longest part, but it's essential.
- Slice with a sharp knife:
- Cut along your scored lines with a hot, wet knife (wipe it between cuts), and each square should release cleanly without cracking the base or dragging the toppings. Serve straight from the fridge or at room temperature—both work, though cold makes the textures more distinct.
 Save to Pinterest
 One afternoon, my niece helped me assemble a batch for a family gathering, and she became obsessed with the geometry of it all—counting the squares, making sure the pattern was mathematically perfect, treating it like a puzzle rather than a dessert. By the time we served it, she'd explained the checkerboard concept to everyone at the table, and suddenly people were eating it strategically, choosing squares in specific orders. It stopped being just food and became a little game we all played together.
Why This Dessert Works
The genius of this square is that it doesn't pretend to be one thing. Most desserts ask you to choose: do you want chocolate or fruit, crunchy or smooth, rich or light? This one says yes to everything, arranged so neatly that it looks like you spent hours fussing when you actually didn't. The checkerboard pattern is both visually striking and functionally smart—it forces you to slow down and think about which square you want next, turning eating into a tiny moment of intention.
Customizing Your Squares
I've played with variations constantly: substituting half the cookies with toasted nuts for extra crunch, swirling mascarpone into the soft layer for richness, using white chocolate when I'm in a lighter mood. One time I added a tiny pinch of espresso powder to the ganache, and it transformed everything into something more sophisticated. The structure stays the same, but the flavors shift with your mood or what you have on hand, which means you can make this exact same dessert a dozen times and never serve the same thing twice.
Timing and Prep
The numbers say 1 hour and 5 minutes, but the real secret is that most of that is passive chilling time while you do other things. The actual hands-on work is maybe 20 minutes, which is why this feels fancy enough for guests but casual enough for a Tuesday afternoon. I usually prep the components earlier in the day, then do the assembly an hour before serving, which spreads out the effort and means less last-minute scrambling.
- Make the caramel sauce the day before if you're making it from scratch—it needs time to cool completely.
- You can prepare all three components (cookie base, cream cheese, ganache) up to 4 hours ahead and keep them covered in the fridge.
- The final assembly takes maybe 10 minutes, so don't stress about perfect timing on party day.
 Save to Pinterest
 What started as a curious dessert I tried at someone else's table has become something I make whenever I want to feel a little clever in the kitchen. It's proof that you don't need complicated techniques or long ingredient lists to create something that makes people pause and smile.
Recipe FAQs
- → How do I achieve a crisp crunchy base?
Use finely crushed shortbread or graham crackers mixed with melted unsalted butter, then press into a baking dish and chill to set firmly.
- → Can I substitute the cream cheese layer?
Mascarpone can be used for a richer texture, and adding a hint of citrus zest brightens the flavor profile.
- → What is the best way to make smooth chocolate ganache?
Heat heavy cream just to simmering before pouring over chopped dark chocolate. Let stand briefly, then stir gently until glossy and smooth.
- → How should the salty layer be prepared?
Use store-bought salted caramel sauce or prepare homemade caramel, then sprinkle flaky sea salt on top for balanced flavor.
- → Any tips for assembling the checkerboard pattern?
Mark the chilled base into a 4x4 grid using a ruler and knife, then carefully fill alternating squares with each layer to avoid adjacent repeats.
- → Can this dessert accommodate dietary preferences?
The dish is vegetarian, but contains dairy and gluten. Nut substitution is possible; always check ingredient labels for allergens.